

It's inevitable -- When you own your first home, the decorating projects pile up and the ideas come faster than you have the time or the resources to complete them. So, I am constantly trying to find ways to decorate frugally.
One of our first projects in our new home was a handmade fabric headboard. I think that this is a great way to add a custom look for very little cost. All you need to make one is a staple gun, six canvas panels, which you can find at any craft or art store, and the fabric of your choice. The amount of panels that you use can vary depending on the the size of bed you have and how grand you want to make it. For this project, I purchased three yards of fabric. It was plenty and I have some leftover.
One of our first projects in our new home was a handmade fabric headboard. I think that this is a great way to add a custom look for very little cost. All you need to make one is a staple gun, six canvas panels, which you can find at any craft or art store, and the fabric of your choice. The amount of panels that you use can vary depending on the the size of bed you have and how grand you want to make it. For this project, I purchased three yards of fabric. It was plenty and I have some leftover.

Jessica Jones, over at How About Orange, has a pretty good tutorial on how to make fabric panels as wall art. Check it out if you need directions on stretching the fabric. Instead of buying pre-stretched canvases, she uses canvas stretchers. These are great for making custom dimensions.
Once you've stretched your fabric, it's time to mount the headboard. Matt and I debated whether or not to connect all the panels before mounting, but we eventually decided to hang each panel individually in a grid. It was tedious and took a couple of attempts, but we finally it together.
Some last notes --
- The fabric is from Amy Butler's Lotus Collection
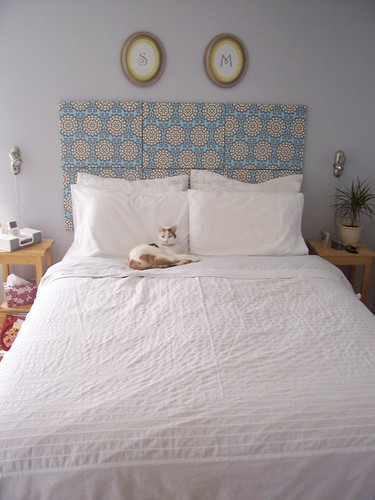
- Be mindful of your fabric design. As you can see here, the fabric design has horizontal and vertical elements which makes it crucial that the fabric is straight when you stretch it.
- The frames above the bed (the S and M stand for Sarah and Matt and nothing more!) fit perfectly with the headboard. I had these frames laying around and decided to use them. The construction was ever so simple. The yellow is some fat quarters that I picked up. The letters are simply printed from my computer. I used the ellipse tool to create an oval, inserted the letters, printed, and cut out the shape.
- That's Iris, our new kitty.
5 comments:
That's a new look for the love nest! Are the panels well attached so that a proper romp doesn't knock'em down?
I love the headboard! And Iris makes the bed look very comfortable... E.D.
This is awesome. Fantastic! I've been desperate to do something with my awful bed situation and you've inspired me. I'm going to try to get it together this weekend.
how are they attached to the wall? just like a normal frame?
Kelly -
Initially, we did had each individual canvas like normal pictures. At first, it worked well but they slowly began to shift and fall, often when we were sleeping :) So, I bought some brackets and connected two canvases together -- top to bottom and hung each of them like regular pictures. They occasionally shift from side-to-side but that's an easy fix. I hope that makes sense :)
Sarah
Post a Comment